Introduction
How to Install a Ceiling Fan is a practical way to improve airflow, increase comfort, and make a room feel cooler without relying entirely on an air conditioner. A properly installed ceiling fan can circulate air throughout a room, help distribute heating and cooling more evenly, and improve everyday comfort. Modern ceiling fans are available in different designs, sizes, and styles, making them suitable for bedrooms, living rooms, offices, kitchens, and covered outdoor spaces.
Although installing a ceiling fan may look like a simple home improvement project, it involves electrical connections, ceiling support, and correct mounting. A fan is heavier and produces more movement than an ordinary ceiling light. For this reason, it must be attached to a properly rated electrical box or fan-support system.
This guide explains how to install a ceiling fan, what tools and materials are needed, how to prepare the ceiling, how to connect the wiring safely, and how to test the fan after installation. It also covers common mistakes, troubleshooting tips, and situations where hiring a qualified electrician is the better choice.
Important safety note: Electrical work can cause serious injury, electric shock, or fire if performed incorrectly. Always turn off the circuit breaker before working, verify that the power is off with an appropriate tester, and follow the manufacturer’s instructions and local electrical regulations. If you are uncertain about the wiring, ceiling support, or electrical requirements, hire a licensed electrician.
Quick Information Table
| Category | Details |
|---|---|
| Project | Ceiling fan installation |
| Main purpose | Improve air circulation and room comfort |
| Installation location | Suitable indoor ceiling or approved covered outdoor area |
| Required support | Fan-rated electrical box or approved fan-support system |
| Main tools | Screwdriver, voltage tester, drill, ladder, and wire strippers |
| Main materials | Ceiling fan kit, mounting bracket, approved connectors, and screws |
| Electrical requirement | Compatible supply circuit and correct wiring |
| Difficulty level | Moderate; electrical work may require a professional |
| Installation time | Depends on ceiling conditions and fan design |
| Main safety requirement | Disconnect and verify electrical power before working |
| Important consideration | Never support a ceiling fan with an ordinary light fixture box |

1. Understand the Ceiling Fan Installation Requirements
Before beginning installation, understand how a ceiling fan is supported and connected.
A ceiling fan is not mounted in the same way as a lightweight decorative light. Its motor rotates continuously, and its blades create movement and vibration. The mounting system must therefore be designed to support both the fan’s weight and its operating forces.
Why a Fan-Rated Electrical Box Is Important
A fan-rated electrical box is designed to support the weight and movement of a ceiling fan. It is usually attached directly to a ceiling joist or an approved structural support system.
An ordinary electrical box designed only for a light fixture may not be strong enough to hold a ceiling fan.
Before installation, check whether the existing ceiling box is specifically rated for fan support. Look for manufacturer markings or documentation. If its rating cannot be confirmed, have it replaced with an approved fan-support box.
Check the Ceiling Structure
The ceiling must be capable of supporting the selected fan.
Depending on the building, the support may consist of:
- Wooden ceiling joists
- Approved metal framing
- A fan-rated support brace
- A manufacturer-approved mounting system
If the fan is being installed in a location without direct access to a suitable joist, a properly rated support brace may be required.
Do not attach a ceiling fan directly to unsupported plasterboard or drywall.
2. Gather the Required Tools and Materials
Preparing everything before starting makes the installation process more organized.
Tools Required
The following tools may be useful:
- Insulated screwdriver
- Phillips screwdriver
- Flathead screwdriver
- Voltage tester or multimeter
- Wire strippers
- Drill and suitable drill bits
- Measuring tape
- Adjustable wrench
- Ladder or stable step ladder
- Safety glasses
- Work gloves
- Flashlight
The exact tools depend on the ceiling fan model and the condition of the existing electrical installation.
Materials Required
You may need:
- Ceiling fan kit
- Fan mounting bracket
- Fan-rated electrical box
- Approved electrical connectors
- Manufacturer-supplied screws
- Downrod, if required
- Fan blades
- Blade brackets
- Remote-control receiver, if included
- Approved support brace, if necessary
Some ceiling fans include all necessary mounting hardware, while others require additional components depending on the ceiling type.
Always check the package contents and installation manual before starting.
3. Choose the Right Ceiling Fan
Selecting the correct fan is an important part of the installation process.
A fan that is too small may not circulate enough air, while an oversized model may be unsuitable for a small room.
Consider Room Size
The diameter of the fan should match the room’s dimensions.
As a general starting point:
| Room Size | Suggested Fan Diameter |
|---|---|
| Small room | 29–36 inches |
| Medium room | 36–48 inches |
| Large room | 48–56 inches |
| Very large room | 56 inches or larger |
These are general guidelines rather than strict requirements. Ceiling height, room layout, furniture placement, and the manufacturer’s airflow recommendations should also be considered.
Check Ceiling Height
A ceiling fan should be installed at a height that allows safe operation and effective air circulation.
For many residential installations, the blades should be at least 7 feet above the finished floor, subject to local regulations and manufacturer requirements.
A longer downrod may be necessary for high ceilings.
For low ceilings, a flush-mount or low-profile fan may be more appropriate.
Choose the Right Fan Style
Ceiling fans are available in several designs.
Standard ceiling fans: These use a downrod and are suitable for many ordinary ceiling heights.
Flush-mount ceiling fans: These attach close to the ceiling and are useful for rooms with limited vertical space.
Outdoor-rated ceiling fans: These are designed for approved outdoor environments. The rating must match the exposure conditions, such as covered or damp locations.
Smart ceiling fans: These may support remote controls, smartphone applications, or smart-home integration.
Choose a fan that is suitable for the room’s conditions and electrical installation.
4. Turn Off the Electrical Power
Never begin electrical installation while the circuit is energized.
Before touching existing wires or removing an electrical fixture, disconnect the electricity at the circuit breaker.
How to Disconnect the Power
- Identify the circuit breaker controlling the existing ceiling light or fan outlet.
- Switch the breaker to the OFF position.
- Inform other people in the property that electrical work is taking place.
- Use a suitable voltage tester to verify that the circuit is de-energized.
- Test the instrument on a known live source before and after checking the circuit, following its instructions.
Do not rely only on a wall switch. A wall switch may not disconnect every conductor in the electrical box.
If the circuit cannot be positively identified or verified as de-energized, stop and contact an electrician.
5. Remove the Existing Ceiling Fixture
If a light fixture is already installed in the location, it may need to be removed before the fan can be mounted.
Remove the Fixture Carefully
- Confirm that the circuit is disconnected and tested.
- Place a stable ladder beneath the fixture.
- Remove the decorative cover or fixture shade.
- Support the fixture while removing its mounting screws.
- Carefully lower the fixture.
- Identify the existing wiring without assuming that wire colors alone indicate their function.
- Disconnect the conductors using the appropriate method.
If the existing fixture is heavy or difficult to support, ask another person to help or have an electrician remove it.
Inspect the Electrical Box
Once the fixture is removed, inspect the electrical box and its attachment.
Check whether:
- It is specifically rated for ceiling fan support.
- It is securely attached to structural framing.
- The mounting surface is stable.
- There is enough space for the fan’s wiring and mounting hardware.
- The electrical cable is undamaged.
If the box is not fan-rated, it must be replaced with an approved fan-support system before the fan is installed.
6. Install the Fan-Rated Support System
A properly installed support system is essential for safe operation.
If the existing box is not suitable, a qualified electrician or competent person working within local regulations should install an approved fan-rated box or brace.
Common Support Options
Direct joist mounting: The fan-rated box is attached to a suitable ceiling joist using approved hardware.
Adjustable fan brace: This type of support can be installed between ceiling joists where direct mounting is not possible.
Special mounting systems: Some ceilings require manufacturer-approved supports designed for particular structural conditions.
The selected support must be appropriate for the fan’s weight and installation requirements.
Never use ordinary drywall anchors, adhesive, or an unsupported light fixture box to hold a ceiling fan.
7. Assemble the Ceiling Fan Components
Many ceiling fans require partial assembly before they are attached to the ceiling.
The assembly process varies between models, so the manufacturer’s instructions should always take priority.
Attach the Mounting Components
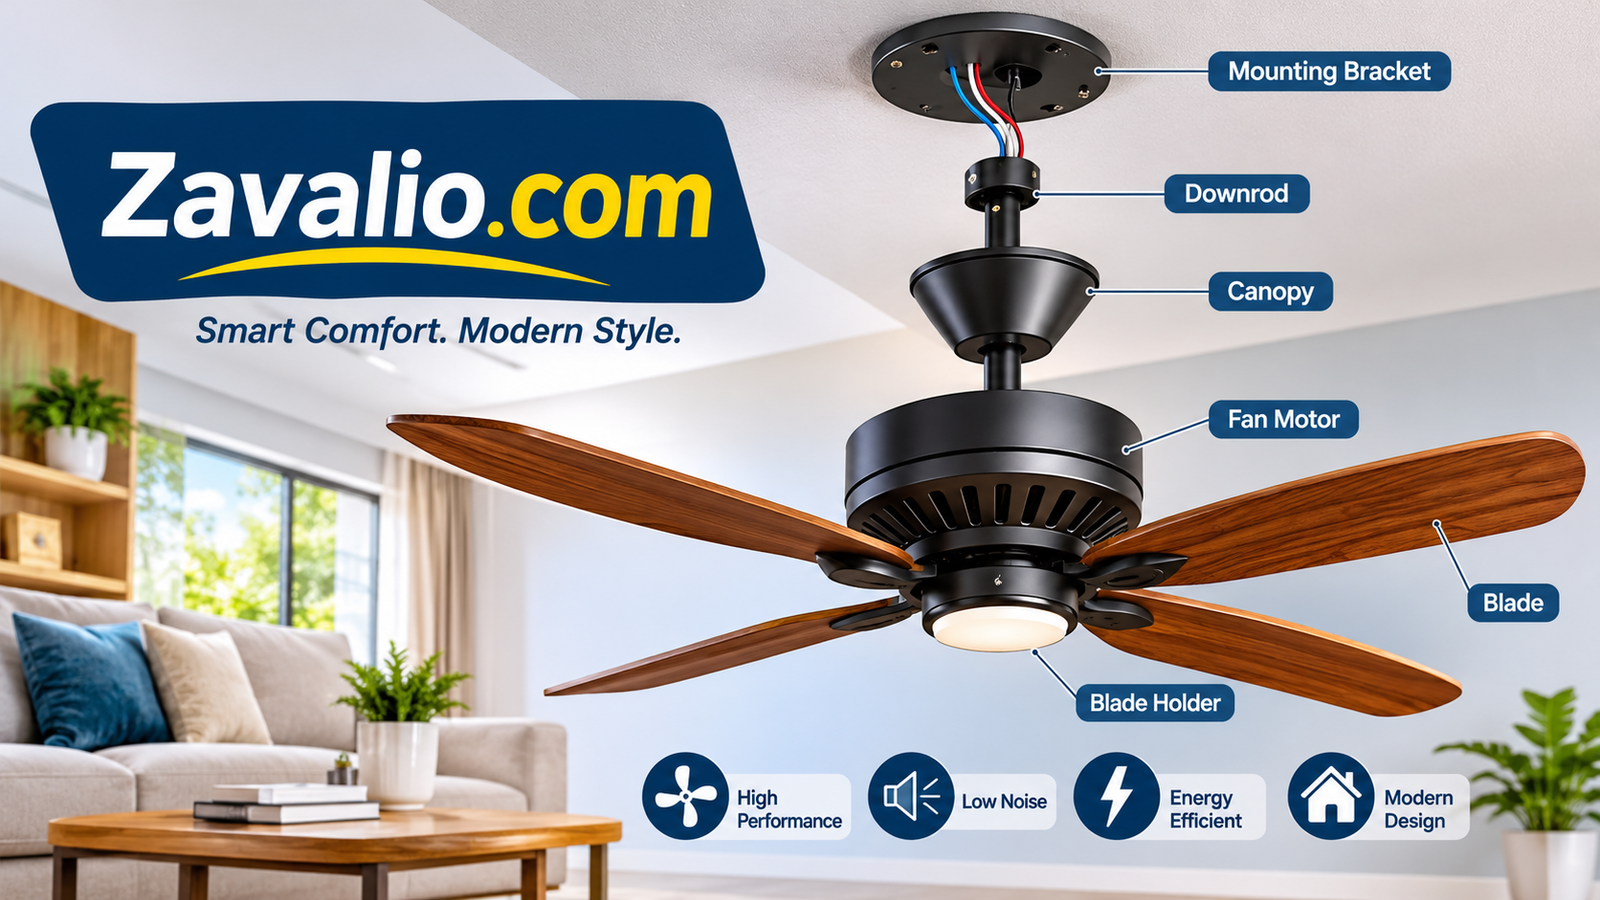
Depending on the design, the fan may include a downrod, canopy, mounting bracket, and motor assembly.
Typical preparation may involve:
- Identify the supplied mounting components.
- Check the downrod and motor assembly for damage.
- Feed the fan wires through the appropriate downrod opening if the design requires it.
- Attach the downrod using the supplied hardware.
- Secure the retaining pin and locking hardware according to the manual.
- Prepare the canopy and mounting cover.
Do not substitute generic bolts or pins for the manufacturer’s specified hardware.
Attach the Fan Blades
Some fans require their blades to be attached before mounting, while others are designed for blade installation afterward.
Follow the supplied instructions.
Check that:
- Each blade is correctly positioned.
- The correct screws are used.
- Blade brackets are securely attached.
- All blades are installed consistently.
- No blade is cracked or damaged.
Incorrect blade installation can create vibration, noise, or poor performance.
8. Install the Ceiling Fan Mounting Bracket
The mounting bracket connects the fan assembly to the fan-rated electrical box.
This component must be securely attached using the supplied hardware and the support system’s approved mounting method.
Mounting the Bracket
- Position the mounting bracket against the fan-rated box.
- Align its mounting holes with the approved attachment points.
- Install the specified screws.
- Tighten the screws according to the manufacturer’s instructions.
- Check that the bracket is secure and does not move.
Do not overtighten screws or use hardware that is not approved for the box.
The mounting bracket must be installed correctly before the motor assembly is supported from it.
9. Connect the Ceiling Fan Wiring
Electrical wiring is one of the most important parts of ceiling fan installation.
The exact wiring arrangement depends on the fan design, supply circuit, wall controls, remote receiver, and local electrical standards.
There is no single wiring diagram that is safe for every installation.
Understand the Main Wire Functions
In many common installations, the wiring system includes:
| Wire Function | General Purpose |
|---|---|
| Live or hot | Supplies electrical power |
| Neutral | Completes the electrical circuit |
| Protective earth or ground | Provides a safety path for fault current |
| Switched live | Supplies power controlled by a wall switch |
Wire colors vary by country, building age, and electrical installation. Never identify a wire’s function using color alone.
Follow the Manufacturer’s Wiring Diagram
Before making any electrical connection:
- Confirm that the circuit is disconnected.
- Identify the function of each conductor using appropriate testing methods.
- Compare the supply wiring with the fan’s wiring diagram.
- Check whether the fan includes a remote-control receiver.
- Confirm the required earthing or grounding arrangement.
- Use only approved connectors and installation methods.
If the supply wiring does not match the manufacturer’s diagram, stop and consult a qualified electrician.
Remote-Controlled Ceiling Fans
Some ceiling fans include a remote-control receiver that sits between the power supply and the fan motor.
The receiver must be installed in the location and orientation specified by the manufacturer.
Do not assume that a remote-controlled fan can be connected in the same way as a basic fan.
Fans With Separate Light Controls
Certain models have separate controls for the motor and built-in light.
These may require additional conductors or a compatible control system.
If the existing wiring does not support the required arrangement, an electrician should assess the installation rather than attempting an improvised connection.
10. Attach the Fan Motor to the Mounting Bracket
After the support system and electrical connections have been prepared, the fan motor can be attached according to the manufacturer’s instructions.
Many models use a temporary hanging hook or a specially designed mounting mechanism to support the motor during installation.
Secure the Fan Assembly
- Support the motor assembly as instructed.
- Position it on the mounting bracket.
- Complete the specified mechanical connection.
- Check that the locking mechanism is fully engaged.
- Arrange the wiring carefully within the approved enclosure.
- Install the canopy cover.
The canopy should fit properly without pinching or damaging the electrical cables.
Do not allow the weight of the fan to rest on electrical conductors.
11. Install the Fan Blades and Light Kit
If the blades were not installed earlier, attach them at this stage.
Attach the Blades
Follow the supplied blade installation diagram.
Make sure every blade is correctly aligned and securely fastened.
If the fan includes blade-balancing clips or weights, keep them available for the final adjustment.
Install the Light Kit
Some ceiling fans include an integrated light or a separate light kit.
Install the components using the manufacturer’s instructions. Check that all covers, connectors, and retaining screws are correctly fitted.
Use only bulbs and light components compatible with the fan’s specifications.
12. Check the Fan Before Switching On the Power
Before restoring electricity, inspect the complete installation.
Check the following:
- The fan-rated support system is secure.
- The mounting bracket is correctly installed.
- The fan motor is properly attached.
- All mechanical fasteners are installed.
- The wiring enclosure is closed.
- No electrical cable is trapped or damaged.
- The blades are securely attached.
- The fan can rotate without hitting nearby objects.
- The light kit, if included, is correctly installed.
If anything appears loose, damaged, or incorrectly fitted, do not energize the circuit.
13. Restore Power and Test the Ceiling Fan
Once the installation has been inspected and confirmed, power can be restored.
Testing the Fan
- Move to a safe position away from the rotating blades.
- Restore power at the circuit breaker.
- Operate the wall switch or remote control.
- Test the fan at its lowest speed.
- Check for unusual sounds or excessive movement.
- Test the other available speed settings.
- Check the light function if the fan includes one.
A properly installed ceiling fan should operate smoothly without unusual vibration, scraping, or electrical noise.
If the fan does not work correctly, switch it off and disconnect the power before inspecting the installation.
14. Common Ceiling Fan Installation Mistakes
Avoiding common mistakes can improve safety and reduce future problems.
Using an Ordinary Light Fixture Box
An ordinary light box may not be designed to support the weight and movement of a ceiling fan.
Always use a fan-rated box or approved support system.
Ignoring Ceiling Height
Installing a fan too low can create a safety hazard. Check the required blade clearance and local regulations before mounting.
Incorrect Wiring
Incorrect wiring can cause the fan or light to malfunction and may create a risk of electric shock or fire.
Follow the manufacturer’s diagram and seek professional assistance when the wiring is unclear.
Loose Blade Screws
Loose screws can create vibration and noise. Confirm that all blade hardware is properly secured.
Choosing the Wrong Fan Size
A fan that is too small may provide insufficient airflow, while an oversized fan may be unsuitable for the room.
Check the manufacturer’s room-size recommendations.
Ignoring Outdoor Ratings
A standard indoor fan may not be suitable for a damp or exposed outdoor location.
Choose a model with the appropriate environmental rating.
15. How to Fix Common Ceiling Fan Problems
Even a correctly installed ceiling fan may occasionally develop operating problems.
Ceiling Fan Does Not Turn On
Possible causes include:
- No electrical supply
- Tripped circuit breaker
- Faulty wall switch
- Remote-control problem
- Incorrect wiring
- Motor or receiver fault
Disconnect the power before inspecting the electrical installation. If the problem involves wiring or internal electrical components, contact an electrician.
Ceiling Fan Wobbles
A wobbling fan may have:
- Unevenly positioned blades
- Loose mounting hardware
- Incorrect blade installation
- Damaged blade brackets
- An unbalanced motor assembly
Switch off the fan before checking its mechanical components. Use a manufacturer-approved balancing kit if necessary.
If the mounting bracket or ceiling support moves, stop using the fan and have the support inspected.
Ceiling Fan Makes Noise
Possible causes include:
- Loose screws
- Incorrectly fitted blade brackets
- Contact between the canopy and ceiling
- Worn motor components
- A damaged blade
- Incorrect installation
Do not ignore unusual scraping, grinding, or electrical buzzing.
Ceiling Fan Light Does Not Work
Possible causes include an incompatible bulb, a loose light component, a remote-control setting, or an electrical fault.
Turn off the power before inspecting the light kit. Follow the manufacturer’s instructions and do not open electrical components unless qualified to do so.
16. Ceiling Fan Maintenance After Installation
Regular maintenance can help keep a ceiling fan operating efficiently.
Clean the Blades
Dust can accumulate on the blades and affect airflow and balance.
Clean them periodically using a soft cloth or a suitable cleaning tool. Follow the manufacturer’s recommendations.
Check Mechanical Fasteners
Inspect accessible mounting and blade hardware for signs of loosening.
Always disconnect the power before performing maintenance that involves touching the fan assembly.
Listen for Unusual Sounds
Changes in operating noise may indicate loose components or a mechanical problem.
Switch off the fan if you notice unusual vibration, scraping, or grinding.
Maintain the Motor and Light Kit
Follow the manufacturer’s maintenance schedule. Some modern ceiling fans use sealed motors that do not require routine lubrication.
Do not apply oil or lubricant unless the manufacturer specifically recommends it.
17. When Should You Hire a Professional Electrician?
Not every ceiling fan installation is suitable for a do-it-yourself project.
Professional assistance is strongly recommended when:
- The existing electrical box is not fan-rated.
- The ceiling structure needs modification.
- The wiring is old, damaged, or difficult to identify.
- There are multiple switches or unusual control arrangements.
- The installation requires new wiring.
- The fan is being installed on a high or sloped ceiling.
- There is no protective earth connection where required.
- Local regulations require electrical work to be completed by a licensed professional.
A qualified electrician can inspect the circuit, install the appropriate support system, confirm wiring compatibility, and ensure the installation meets local safety requirements.
Frequently Asked Questions About Installing a Ceiling Fan
1. Can I install a ceiling fan myself?
Some people with suitable experience can install a ceiling fan, provided the existing electrical system and support structure are appropriate and local regulations allow it. However, electrical connections and structural support must be handled correctly. Hire an electrician if you are unsure.
2. Can I install a ceiling fan where a light fixture was installed?
Yes, but only if the existing electrical box and structural support are suitable for a ceiling fan. An ordinary light fixture box should not be assumed to be fan-rated.
3. How long does ceiling fan installation take?
The time depends on the fan model, ceiling construction, existing wiring, and whether a new support system is needed. Replacing a compatible existing fan may be relatively straightforward, while installing a new electrical box can take considerably longer.
4. What tools are needed to install a ceiling fan?
Common tools include a screwdriver, voltage tester, drill, wire strippers, adjustable wrench, measuring tape, and stable ladder. The exact requirements depend on the model.
5. How high should a ceiling fan be installed?
For many residential installations, fan blades should be at least 7 feet above the finished floor. Always check local requirements and the manufacturer’s instructions.
6. Can I install a ceiling fan without a downrod?
Yes. Some models are designed for flush mounting or low-profile installation. The correct mounting style depends on the fan design and ceiling height.
7. Why does my ceiling fan wobble after installation?
Wobbling can result from uneven blades, loose fasteners, incorrect blade installation, or an unstable mounting system. Switch off the fan and inspect the components according to the manufacturer’s instructions.
8. Can a ceiling fan be installed on a sloped ceiling?
Some ceiling fans support angled or sloped ceilings when used with an approved mounting system and compatible downrod. Check the manufacturer’s specifications before installation.
9. Do all ceiling fans need grounding?
The grounding or protective-earthing requirements depend on the fan’s electrical design and local electrical regulations. Follow the manufacturer’s instructions and applicable electrical standards. Never remove or bypass a required protective-earth connection.
10. How often should I clean my ceiling fan?
Cleaning frequency depends on dust levels and usage. Regularly inspect the blades and clean them when dust becomes visible. Follow the manufacturer’s maintenance recommendations.
Final Thoughts
Installing a ceiling fan can improve airflow, increase comfort, and add practical value to a room. However, successful installation depends on choosing the right fan, checking the ceiling structure, using a properly rated support system, and following the correct electrical installation requirements.
The most important safety rule is to never mount a ceiling fan on an ordinary light fixture box or unsupported drywall. Electrical power must be disconnected and verified before any wiring work begins. Every mechanical and electrical connection should follow the manufacturer’s instructions.
For straightforward replacements, an existing fan-rated support system may make the project easier. For new installations, uncertain wiring, or structural modifications, hiring a qualified electrician is the safest option. With proper preparation and regular maintenance, a correctly installed ceiling fan can provide reliable airflow and comfort for many years.